USPS Intelligent Mail Barcodes
FormFusion 3.3 and higher supports the ability to print United States Postal Service Intelligent Mail barcodes on your FormFusion templates, which can save you both time and money. The USPS provides mailing discounts to customers who use these barcodes to identify large volumes of outgoing mail. This solution is also known as the USPS OneCode Solution or USPS 4-State Customer barcode (4CB, 4-CB, or USPS4CB).
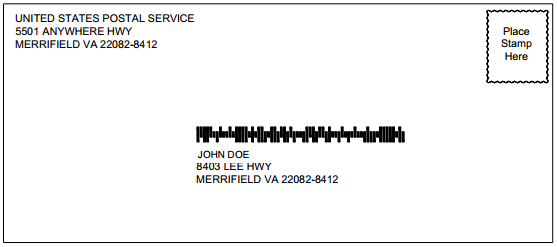
The barcode is made up of a numeric string that is printed using a barcode font. It is placed on your FormStamp in such a way that it will print on envelopes or on the mailer portion of a form.
The barcode consists of a 20 to 31-digit number containing information identifying the sender, the mail class, and the destination ZIP code. The first half of the barcode is a tracking code composed of the barcode identifier, service type identifier, mailer identifier, and serial number. The second half contains the recipient's routing (ZIP) code.
| Code | Field | Digits | Description |
|---|---|---|---|
| Tracking code | Barcode Identifier | 2 | Presort identification number – describes whether or not the mail has already been sorted to some extent. Chart of USPS Barcode Identifiers. |
| Tracking code | Service Type Identifier | 3 | Type of mail service (e.g. first class, standard, priority, etc.). Chart of USPS Service Type Identifiers. |
| Tracking code | Mailer Identifier | 6 or 9 | Unique number identifying the USPS customer (the sender). Assigned by USPS . |
| Tracking code | Serial number | 9 or 6 |
Sender’s serial or sequence number to track each piece of mail.
|
| Routing code | Delivery point ZIP code | 0, 5, 9, or 11 | Recipient’s ZIP code. |
| Total | - | 20-31 | Total barcode length depends on length of routing code |
For exact specifications and any updates or changes, please refer to the USPS publications available at https://postalpro.usps.com/mailing/intelligent-mail-barcode.
There are three setup steps required to produce Intelligent Mail barcodes in FormFusion:
- Install the barcode font.
- Map or create the numeric string to be encoded, based on data in the input file.
- Add the variable containing the string to the FormStamp, and encode it as an Intelligent Mail barcode.
Installing the Barcode Font
The Intelligent Mail barcode font can be downloaded from the USPS website linked above, or from the Evisions website. After unzipping the file, refer to the instructions in the \docs\ folder to install the fonts.
As with any other font, it must be installed on both the template developer’s machine and the MAPS server. The list of fonts visible in the drop-downs in FormFusion is populated from the client machine, but the fonts used at run time are those on the server (since MAPS does the actual job processing).
In order to print hard copy output, the MAPS server must be rebooted before any new fonts can be used. PDF output should render correctly without a reboot. Note that it is the actual machine that must be restarted, not just the MAPS service.
Storing the Numeric String into a FormFusion Variable
Depending on the input file, it may be possible to read in some or all of the string from the input file using MapForm variables. Alternatively, use a CaptureForm query to build the input string, incorporating information from MapForm as needed.
The following example builds a CaptureForm query that hard codes most of the USPS options, and uses the recipient’s ZIP code from the input file.
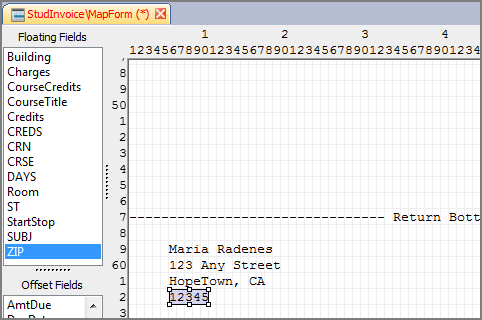
- In MapForm, use a floating or offset field to map the ZIP code from the input file.
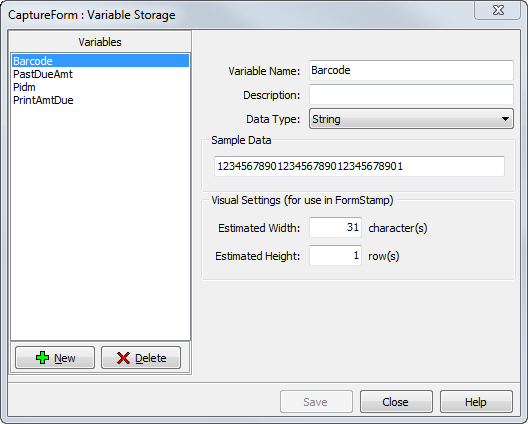
- Create a new string SQL variable in Variable Storage.
- Create a CaptureForm query that builds the numeric string. Use the :ZIP variable at the end of the string for the Routing Code.
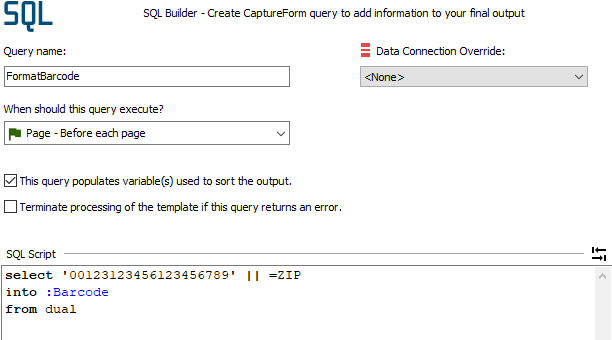
Notice how the rest of the string has been entered as static text. If another part of the string (e.g. the serial number) will be using variable input, edit the query to use the additional variables.
Adding the Barcode to FormStamp
- Add the :Barcode variable to the FormStamp using a data field. Place it where the barcode should appear on the form.
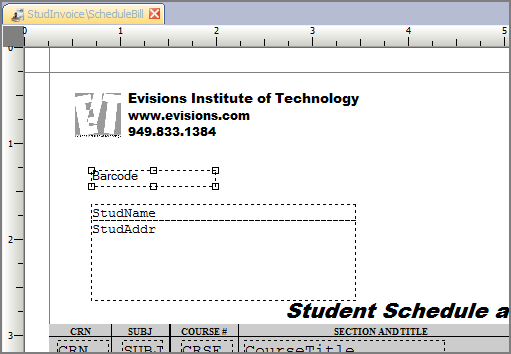
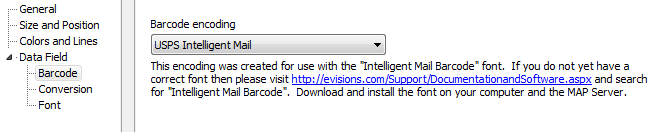
- Double click the data field to edit its properties. On the Barcode tab, select “USPS Intelligent Mail” in the encoding drop-down.
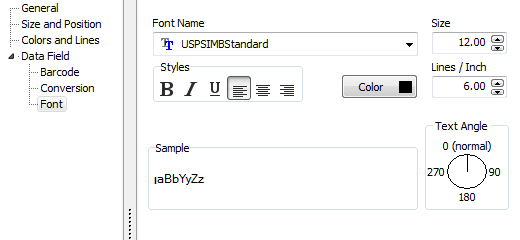
- On the Font tab, choose the “USPSIMBStandard” font.
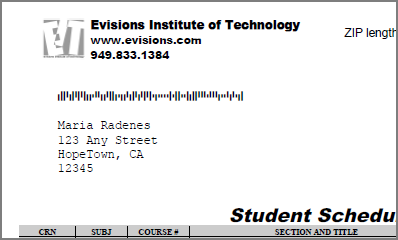
Click OK to exit out of the dialog. Then, save the template. - If preview mode is turned on, the barcode displays as string data on the FormStamp. To see how the barcode actually looks, do a test print template.
Troubleshooting
Nothing is printing where the barcode should appear
If the barcode encoder receives invalid input, it will not print. This feature helps to prevent mail from being sent out with invalid barcodes.
- Check to make sure that the barcode variable contains exactly the right number of characters. Valid numeric string lengths are 20, 25, 29, and 31 characters, depending on the length of the ZIP code.
- Verify that each of the USPS-defined fields is correct. For example, the Barcode Identifier must be one of the six values shown in the USPS chart linked above.
- To view the numeric string being stored in the barcode variable, temporarily turn off the barcode encoding in the object properties and print it as plain text.
The barcode is printing as a string of letters instead of as a barcode
This indicates that the numeric string has been encoded, but the system is unable to use the barcode font that turns the character string into an actual barcode. Check to make sure that:
- The font has been installed on the local machine and on the MAPS server.
- The “USPSIMBStandard” font is selected in the object properties for the variable.
- The MAPS server has been rebooted since the font was installed.
The barcode is the wrong size/in the wrong location
Refer to the Font User Guide included in the \docs\ folder of the downloaded USPS fonts zip file for information on the size, location, and surrounding padding required for Intelligent Mail barcodes.
- To adjust the size, choose a different font size in the object properties for the barcode.
- To change the location, click and drag the barcode object. If printing the barcode above the address block, align the left side of the barcode object with the left side of the address. Turning on alignment tools can make it easier to line up multiple objects.
Recipients of PDF files are unable to view the barcodes
By default, PDF files do not include custom fonts in the file. If such a PDF file uses a font that the viewer does not have installed, it chooses a substitute font. To make sure that barcodes display correctly in PDF output, turn on font embedding in the PDF options of the FormDirector.